React.js Conf

October 27, 2014 by Vjeux


Every few weeks someone asks us when we are going to organize a conference for React. Our answer has always been "some day". In the mean time, people have been talking about React at other JavaScript conferences around the world. But now the time has finally come for us to have a conference of our own.

We're happy to announce React.js Conf! It will take place January 28-29, 2015 on Facebook's campus in Menlo Park, California.

Before we open registration, we're looking for great talks. We want to see how you pushed application development forward! If you ever talked to a meet-up, pitched React to your co-workers, or done something awesome and want to talk about it, let us know!

Here are some areas of research we want to explore during the conference if you need some inspiration: server-side rendering, data fetching, language features (eg es6, clojure), immutability, rendering targets (eg svg, canvas), real-time updates...

We look forward to seeing many of you in person in just a few short months!

Community Round-up #23

October 17, 2014 by Lou Husson


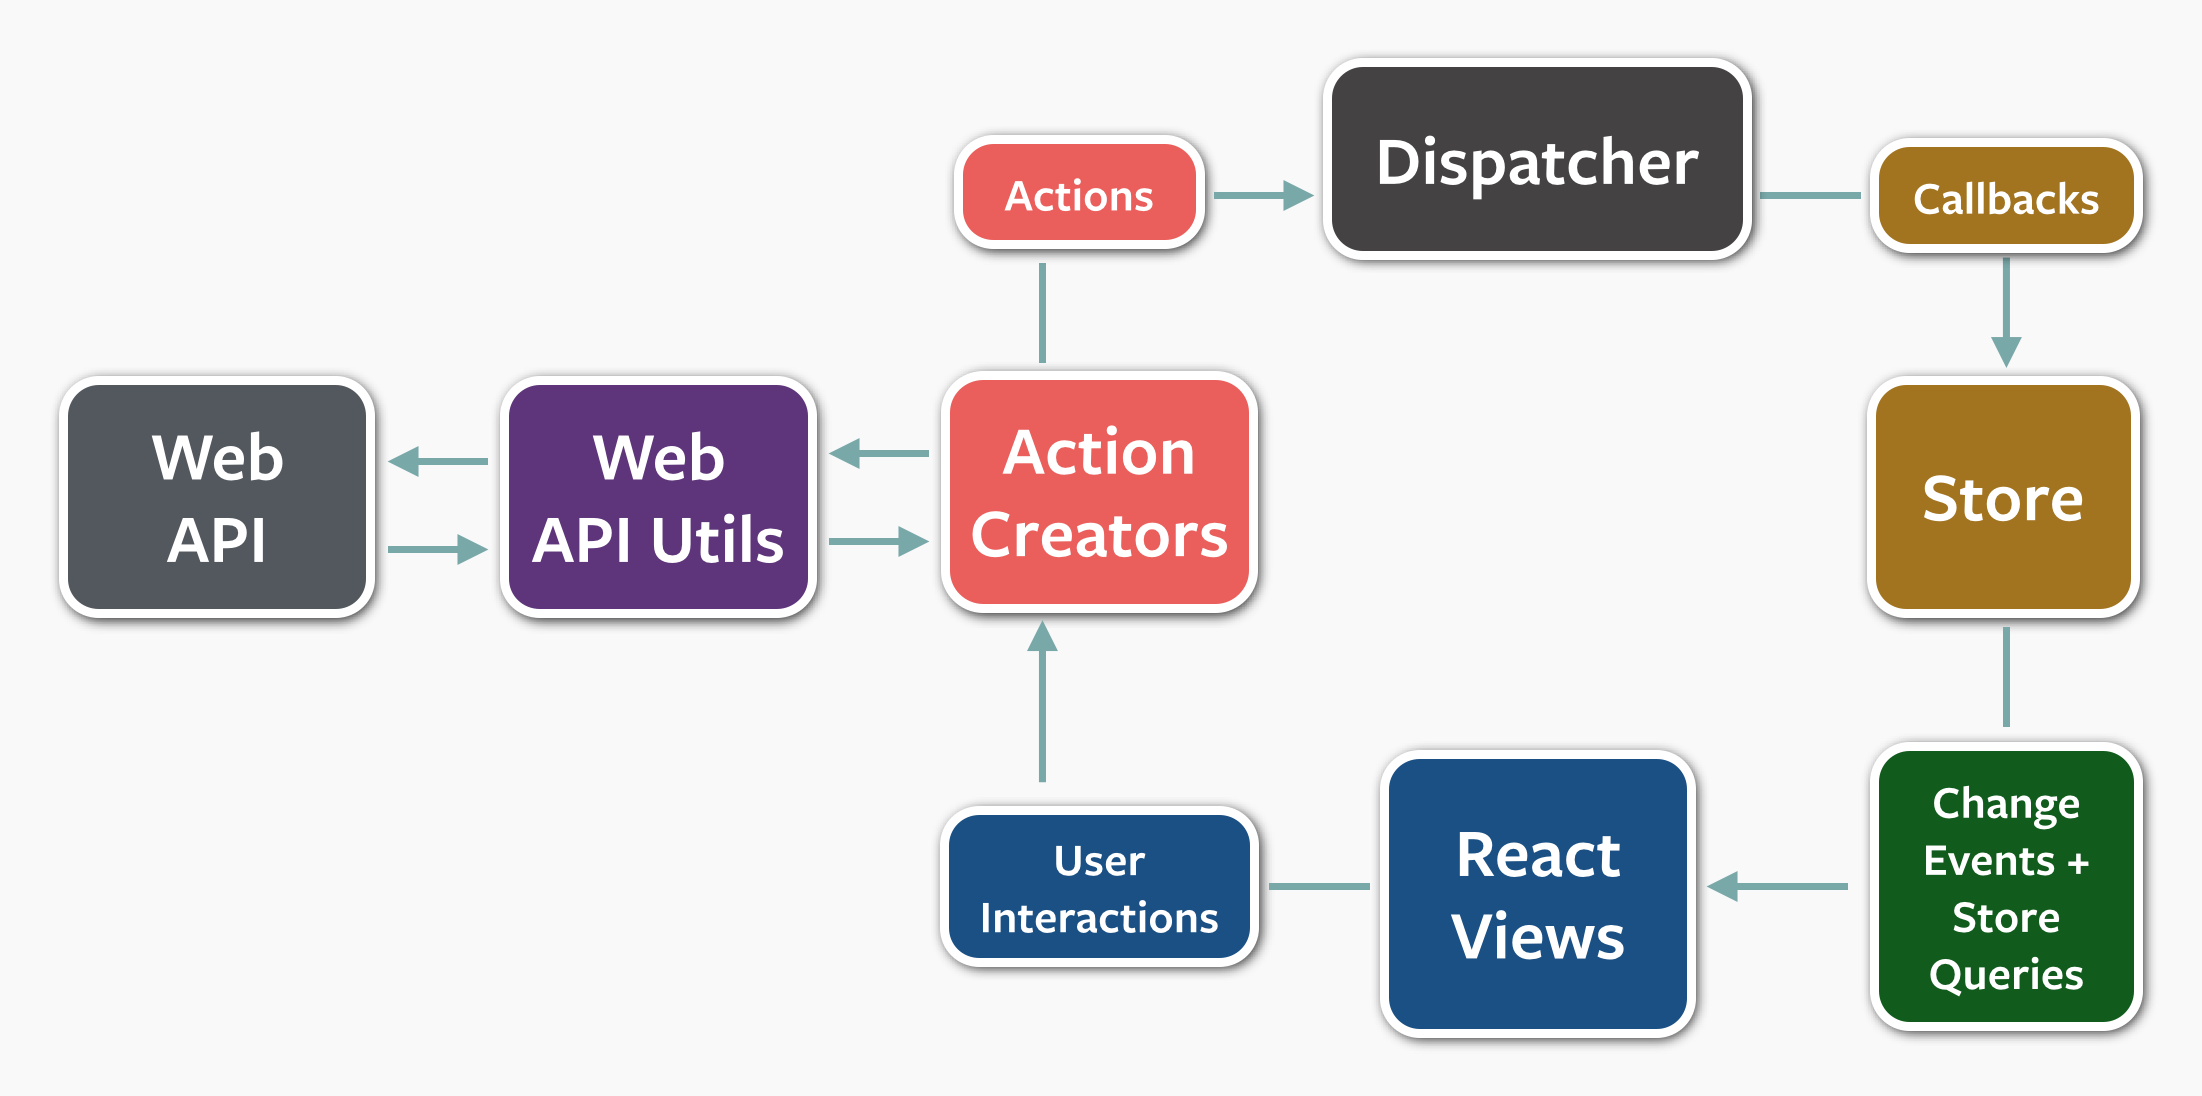
This round-up is a special edition on Flux. If you expect to see diagrams showing arrows that all point in the same direction, you won't be disappointed!

React And Flux at ForwardJS #

Facebook engineers Jing Chen and Bill Fisher gave a talk about Flux and React at ForwardJS, and how using an application architecture with a unidirectional data flow helped solve recurring bugs.

Yahoo #

Yahoo is converting Yahoo Mail to React and Flux and in the process, they open sourced several components. This will help you get an isomorphic application up and running.

Reflux #

Mikael Brassman wrote Reflux, a library that implements Flux concepts. Note that it diverges significantly from the way we use Flux at Facebook. He explains the reasons why in a blog post.

React and Flux Interview #

Ian Obermiller, engineer at Facebook, made a lengthy interview on the experience of using React and Flux in order to build probably the biggest React application ever written so far.

I’ve actually said this many times to my team too, I love React. It’s really great for making these complex applications. One thing that really surprised me with it is that React combined with a sane module system like CommonJS, and making sure that you actually modulize your stuff properly has scaled really well to a team of almost 10 developers working on hundreds of files and tens of thousands of lines of code.

Really, a fairly large code base... stuff just works. You don’t have to worry about mutating, and the state of the DOM just really makes stuff easy. Just conceptually it’s easier just to think about here’s what I have, here’s my data, here’s how it renders, I don’t care about anything else. For most cases that is really simplifying and makes it really fast to do stuff.

Read the full interview...

Adobe's Brackets Project Tree #

Kevin Dangoor is converting the project tree of Adobe's Bracket text editor to React and Flux. He wrote about his experience using Flux.

Async Requests with Flux Revisited #

Reto Schläpfer came back to a Flux project he hasn't worked on for a month and saw many ways to improve the way he implemented Flux. He summarized his learnings in a blog post.

The smarter way is to call the Web Api directly from an Action Creator and then make the Api dispatch an event with the request result as a payload. The Store(s) can choose to listen on those request actions and change their state accordingly.

Before I show some updated code snippets, let me explain why this is superior:

  • There should be only one channel for all state changes: The Dispatcher. This makes debugging easy because it just requires a single console.log in the dispatcher to observe every single state change trigger.

  • Asynchronously executed callbacks should not leak into Stores. The consequences of it are just too hard to fully foresee. This leads to elusive bugs. Stores should only execute synchronous code. Otherwise they are too hard to understand.

  • Avoiding actions firing other actions makes your app simple. We use the newest Dispatcher implementation from Facebook that does not allow a new dispatch while dispatching. It forces you to do things right.

Read the full article...

Undo-Redo with Immutable Data Structures #

Ameya Karve explained how to use Mori, a library that provides immutable data structures, in order to implement undo-redo. This usually very challenging feature only takes a few lines of code with Flux!

undo: function() {
  this.redoStates = Mori.conj(this.redoStates, Mori.first(this.undoStates));
  this.undoStates = Mori.drop(1, this.undoStates);
  this.todosState = Mori.first(this.undoStates);
  this.canUndo = Mori.count(this.undoStates) > 1;
  this.canRedo = true;
  if (Mori.count(this.undoStates) > 1) {
    this.todos = JSON.parse(this.todosState);
  } else {
    this.todos = [];
  }
  this.emit('change');
},

Flux in practice #

Gary Chambers wrote a guide to get started with Flux. This is a very practical introduction to Flux.

So, what does it actually mean to write an application in the Flux way? At that moment of inspiration, when faced with an empty text editor, how should you begin? This post follows the process of building a Flux-compliant application from scratch.

Read the full guide...

Components, React and Flux #

Dan Abramov working at Stampsy made a talk about React and Flux. It's a very good overview of the concepts at play.

React and Flux #

Christian Alfoni wrote an article where he compares Backbone, Angular and Flux on a simple example that's representative of a real project he worked on.

Wow, that was a bit more code! Well, try to think of it like this. In the above examples, if we were to do any changes to the application we would probably have to move things around. In the FLUX example we have considered that from the start.

Any changes to the application is adding, not moving things around. If you need a new store, just add it and make components dependant of it. If you need more views, create a component and use it inside any other component without affecting their current "parent controller or models".

Read the full article...

Flux: Step by Step approach #

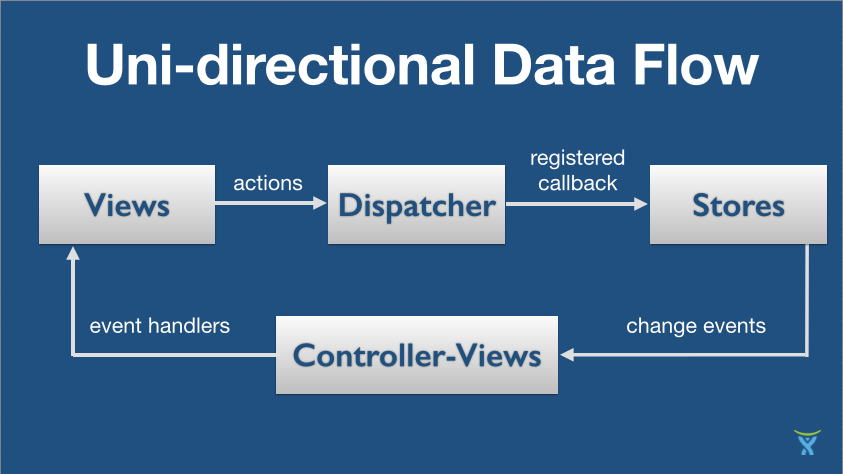
Nicola Paolucci from Atlassian wrote a great guide to help your getting understand Flux step by step.

DeLorean: Back to the future! #

DeLorean is a tiny Flux pattern implementation developed by Fatih Kadir Akin.

  • Unidirectional data flow, it makes your app logic simpler than MVC
  • Automatically listens to data changes and keeps your data updated
  • Makes data more consistent across your whole application
  • It's framework agnostic, completely. There's no view framework dependency
  • Very small, just 4K gzipped
  • Built-in React.js integration, easy to use with Flight.js and Ractive.js and probably all others
  • Improve your UI/data consistency using rollbacks

Facebook's iOS Infrastructure #

Last but not least, Flux and React ideas are not limited to JavaScript inside of the browser. The iOS team at Facebook re-implemented Newsfeed using very similar patterns.

Random Tweet #

React v0.12 RC

October 16, 2014 by Sebastian Markbåge


We are finally ready to share the work we've been doing over the past couple months. A lot has gone into this and we want to make sure we iron out any potential issues before we make this final. So, we're shipping a Release Candidate for React v0.12 today. If you get a chance, please give it a try and report any issues you find! A full changelog will accompany the final release but we've highlighted the interesting and breaking changes below.

The release candidate is available for download:

We've also published version 0.12.0-rc1 of the react and react-tools packages on npm and the react package on bower.

React Elements #

The biggest conceptual change we made in v0.12 is the move to React Elements. We talked about this topic in depth earlier this week. If you haven't already, you should read up on the exciting changes in there!

JSX Changes #

Earlier this year we decided to write a specification for JSX. This has allowed us to make some changes focused on the React specific JSX and still allow others to innovate in the same space.

The @jsx Pragma is Gone! #

We have wanted to do this since before we even open sourced React. No more /** @jsx React.DOM */!. The React specific JSX transform assumes you have React in scope (which had to be true before anyway).

JSXTransformer and react-tools have both been updated to account for this.

JSX for Function Calls is No Longer Supported #

The React specific JSX transform no longer transforms to function calls. Instead we use React.createElement and pass it arguments. This allows us to make optimizations and better support React as a compile target for things like Om. Read more in the React Elements introduction.

The result of this change is that we will no longer support arbitrary function calls. We understand that the ability to do was a convenient shortcut for many people but we believe the gains will be worth it.

JSX Lower-case Convention #

We used to have a whitelist of HTML tags that got special treatment in JSX. However as new HTML tags got added to the spec, or we added support for more SVG tags, we had to go update our whitelist. Additionally, there was ambiguity about the behavior. There was always the chance that something new added to the tag list would result in breaking your code. For example:

return <component />;

Is component an existing HTML tag? What if it becomes one?

To address this, we decided on a convention: All JSX tags that start with a lower-case letter or contain a dash are treated as HTML.

This means that you no longer have to wait for us to upgrade JSX to use new tags. This also introduces the possibility to consume custom elements (Web Components) - although custom attributes are not yet fully supported.

Currently we still use the whitelist as a sanity check. The transform will fail when it encounters an unknown tag. This allows you to update your code without hitting errors in production.

In addition, the HTML tags are converted to strings instead of using React.DOM directly. <div/> becomes React.createElement('div') instead of React.DOM.div().

JSX Spread Attributes #

Previously there wasn't a way to for you to pass a dynamic or unknown set of properties through JSX. This is now possible using the spread ... operator.

var myProps = { a: 1, b: 2 };
return <MyComponent {...myProps} />;

This merges the properties of the object onto the props of MyComponent.

Read More About Spread Attributes

If you used to use plain function calls to pass arbitrary props objects...

return MyComponent(myProps);

You can now switch to using Spread Attributes instead:

return <MyComponent {...myProps} />;

Breaking Change: key and ref Removed From this.props #

The props key and ref were already reserved property names. This turned out to be difficult to explicitly statically type since any object can accept these extra props. It also screws up JIT optimizations of React internals in modern VMs.

These are concepts that React manages from outside the Component before it even gets created so it shouldn't be part of the props.

We made this distinction clearer by moving them off the props object and onto the ReactElement itself. This means that you need to rename:

someElement.props.key -> someElement.key

You can no longer access this.props.ref and this.props.key from inside the Component instance itself. So you need to use a different name for those props.

You do NOT need to change the way to define key and ref, only if you need to read it. E.g. <div key="my-key" /> and div({ key: 'my-key' }) still works.

Breaking Change: Default Props Resolution #

This is a subtle difference but defaultProps are now resolved at ReactElement creation time instead of when it's mounted. This is means that we can avoid allocating an extra object for the resolved props.

You will primarily see this breaking if you're also using transferPropsTo.

Deprecated: transferPropsTo #

transferPropsTo is deprecated in v0.12 and will be removed in v0.13. This helper function was a bit magical. It auto-merged a certain whitelist of properties and excluded others. It was also transferring too many properties. This meant that we have to keep a whitelist of valid HTML attributes in the React runtime. It also means that we can't catch typos on props.

Our suggested solution is to use the Spread Attributes.

return <div {...this.props} />;

Or, just if you're not using JSX:

return div(this.props);

Although to avoid passing too many props down, you'll probably want to use something like ES7 rest properties. Read more about upgrading from transferPropsTo.

Deprecated: Returning false in Event Handlers #

It used to be possible to return false from event handlers to preventDefault. We did this because this works in most browsers. This is a confusing API and we might want to use the return value for something else. Therefore, this is deprecated. Use event.preventDefault() instead.

Renamed APIs #

As part of the new React terminology we aliased some existing APIs to use the new naming convention:

  • React.renderComponent -> React.render
  • React.renderComponentToString -> React.renderToString
  • React.renderComponentToStaticMarkup -> React.renderToStaticMarkup
  • React.isValidComponent -> React.isValidElement
  • React.PropTypes.component -> React.PropTypes.element
  • React.PropTypes.renderable -> React.PropTypes.node

The older APIs will log a warning but work the same. They will be removed in v0.13.

Introducing React Elements

October 14, 2014 by Sebastian Markbåge


The upcoming React 0.12 tweaks some APIs to get us close to the final 1.0 API. This release is all about setting us up for making the ReactElement type really FAST, jest unit testing easier, making classes simpler (in preparation for ES6 classes) and better integration with third-party languages!

If you currently use JSX everywhere, you don't really have to do anything to get these benefits! The updated transformer will do it for you.

If you can't or don't want to use JSX, then please insert some hints for us. Add a React.createFactory call around your imported class when you require it:

var MyComponent = React.createFactory(require('MyComponent'));

Everything is backwards compatible for now, and as always React will provide you with descriptive console messaging to help you upgrade.

ReactElement is the primary API of React. Making it faster has shown to give us several times faster renders on common benchmarks. The API tweaks in this release helps us get there.

Continue reading if you want all the nitty gritty details...

New Terminology #

We wanted to make it easier for new users to see the parallel with the DOM (and why React is different). To align our terminology we now use the term ReactElement instead of descriptor. Likewise, we use the term ReactNode instead of renderable.

See the full React terminology guide.

Creating a ReactElement #

We now expose an external API for programmatically creating a ReactElement object.

var reactElement = React.createElement(type, props, children);

The type argument is either a string (HTML tag) or a class. It's a description of what tag/class is going to be rendered and what props it will contain. You can also create factory functions for specific types. This basically just provides the type argument for you:

var div = React.createFactory('div');
var reactDivElement = div(props, children);

Deprecated: Auto-generated Factories #

Imagine if React.createClass was just a plain JavaScript class. If you call a class as a plain function you would call the component's constructor to create a Component instance, not a ReactElement:

new MyComponent(); // Component, not ReactElement

React 0.11 gave you a factory function for free when you called React.createClass. This wrapped your internal class and then returned a ReactElement factory function for you.

var MyComponent = React.createFactory(
  class {
    render() {
      ...
    }
  }
);

In future versions of React, we want to be able to support pure classes without any special React dependencies. To prepare for that we're deprecating the auto-generated factory.

This is the biggest change to 0.12. Don't worry though. This functionality continues to work the same for this release, it just warns you if you're using a deprecated API. That way you can upgrade piece-by-piece instead of everything at once.

Upgrading to 0.12 #

React With JSX #

If you use the React specific JSX transform, the upgrade path is simple. Just make sure you have React in scope.

// If you use node/browserify modules make sure
// that you require React into scope.
var React = require('react');

React's JSX will create the ReactElement for you. You can continue to use JSX with regular classes:

var MyComponent = React.createClass(...);

var MyOtherComponent = React.createClass({
  render: function() {
    return <MyComponent prop="value" />;
  }
});

NOTE: React's JSX will not call arbitrary functions in future releases. This restriction is introduced so that it's easier to reason about the output of JSX by both the reader of your code and optimizing compilers. The JSX syntax is not tied to React. Just the transpiler. You can still use the JSX spec with a different transpiler for custom purposes.

React Without JSX #

If you don't use JSX and just call components as functions, you will need to explicitly create a factory before calling it:

var MyComponentClass = React.createClass(...);

var MyComponent = React.createFactory(MyComponentClass); // New step

var MyOtherComponent = React.createClass({
  render: function() {
    return MyComponent({ prop: 'value' });
  }
});

If you're using a module system, the recommended solution is to export the class and create the factory on the requiring side.

Your class creation is done just like before:

// MyComponent.js
var React = require('react');
var MyComponent = React.createClass(...);
module.exports = MyComponent;

The other side uses React.createFactory after requireing the component class:

// MyOtherComponent.js
var React = require('react');
// All you have to do to upgrade is wrap your requires like this:
var MyComponent = React.createFactory(require('MyComponent'));

var MyOtherComponent = React.createClass({
  render: function() {
    return MyComponent({ prop: 'value' });
  }
});

module.exports = MyOtherComponent;

You ONLY have to do this for custom classes. React still has built-in factories for common HTML elements.

var MyDOMComponent = React.createClass({
  render: function() {
    return React.DOM.div({ className: 'foo' }); // still ok
  }
});

We realize that this is noisy. At least it's on the top of the file (out of sight, out of mind). This a tradeoff we had to make to get the other benefits that this model unlocks.

Anti-Pattern: Exporting Factories #

If you have an isolated project that only you use, then you could create a helper that creates both the class and the factory at once:

// Anti-pattern - Please, don't use
function createClass(spec) {
  return React.createFactory(React.createClass(spec));
}

This makes your components incompatible with jest testing, consumers using JSX, third-party languages that implement their own optimized ReactElement creation, etc.

It also encourages you to put more logic into these helper functions. Something that another language, a compiler or a reader of your code couldn't reason about.

To fit into the React ecosystem we recommend that you always export pure classes from your shared modules and let the consumer decide the best strategy for generating ReactElements.

Third-party Languages #

The signature of a ReactElement is something like this:

{
  type : string | class,
  props : { children, className, etc. },
  key : string | boolean | number | null,
  ref : string | null
}

Languages with static typing that don't need validation (e.g. Om in ClojureScript), and production level compilers will be able to generate these objects inline instead of going through the validation step. This optimization will allow significant performance improvements in React.

Your Thoughts and Ideas #

We'd love to hear your feedback on this API and your preferred style. A plausible alternative could be to directly inline objects instead of creating factory functions:

// MyOtherComponent.js
var React = require('react');
var MyComponent = require('MyComponent');

var MyOtherComponent = React.createClass({
  render: function() {
    return { type: MyComponent, props: { prop: 'value' } };
  }
});

module.exports = MyOtherComponent;

This moves the noise down into the render method though. It also doesn't provide a hook for dynamic validation/type checking so you'll need some other way to verify that it's safe.

NOTE: This won't work in this version of React because it's conflicting with other legacy APIs that we're deprecating. (We temporarily add a element._isReactElement = true marker on the object.)

The Next Step: ES6 Classes #

After 0.12 we'll begin work on moving to ES6 classes. We will still support React.createClass as a backwards compatible API. If you use an ES6 transpiler you will be able to declare your components like this:

export class MyComponent {
  render() {
    ...
  }
};

This upcoming release is a stepping stone to make it as easy as this. Thanks for your support.

Testing Flux Applications

September 24, 2014 by Bill Fisher


A more up-to-date version of this post is available as part of the Flux documentation.

Flux is the application architecture that Facebook uses to build web applications with React. It's based on a unidirectional data flow. In previous blog posts and documentation articles, we've shown the basic structure and data flow, more closely examined the dispatcher and action creators, and shown how to put it all together with a tutorial. Now let's look at how to do formal unit testing of Flux applications with Jest, Facebook's auto-mocking testing framework.

Testing with Jest #

For a unit test to operate on a truly isolated unit of the application, we need to mock every module except the one we are testing. Jest makes the mocking of other parts of a Flux application trivial. To illustrate testing with Jest, we'll return to our example TodoMVC application.

The first steps toward working with Jest are as follows:

  1. Get the module dependencies for the application installed by running npm install.
  2. Create a directory __tests__/ with a test file, in this case TodoStore-test.js
  3. Run npm install jest-cli —save-dev
  4. Add the following to your package.json
{
  ...
  "scripts": {
    "test": "jest"
  }
  ...
}

Now you're ready to run your tests from the command line with npm test.

By default, all modules are mocked, so the only boilerplate we need in TodoStore-test.js is a declarative call to Jest's dontMock() method.

jest.dontMock('TodoStore');

This tells Jest to let TodoStore be a real object with real, live methods. Jest will mock all other objects involved with the test.

Testing Stores #

At Facebook, Flux stores often receive a great deal of formal unit test coverage, as this is where the application state and logic lives. Stores are arguably the most important place in a Flux application to provide coverage, but at first glance, it's not entirely obvious how to test them.

By design, stores can't be modified from the outside. They have no setters. The only way new data can enter a store is through the callback it registers with the dispatcher.

We therefore need to simulate the Flux data flow with this one weird trick.

var mockRegister = MyDispatcher.register;
var mockRegisterInfo = mockRegister.mock;
var callsToRegister = mockRegisterInfo.calls;
var firstCall = callsToRegister[0];
var firstArgument = firstCall[0];
var callback = firstArgument;

We now have the store's registered callback, the sole mechanism by which data can enter the store.

For folks new to Jest, or mocks in general, it might not be entirely obvious what is happening in that code block, so let's look at each part of it a bit more closely. We start out by looking at the register() method of our application's dispatcher — the method that the store uses to register its callback with the dispatcher. The dispatcher has been thoroughly mocked automatically by Jest, so we can get a reference to the mocked version of the register() method just as we would normally refer to that method in our production code. But we can get additional information about that method with the mock property of that method. We don't often think of methods having properties, but in Jest, this idea is vital. Every method of a mocked object has this property, and it allows us to examine how the method is being called during the test. A chronologically ordered list of calls to register() is available with the calls property of mock, and each of these calls has a list of the arguments that were used in each method call.

So in this code, we are really saying, "Give me a reference to the first argument of the first call to MyDispatcher's register() method." That first argument is the store's callback, so now we have all we need to start testing. But first, we can save ourselves some semicolons and roll all of this into a single line:

callback = MyDispatcher.register.mock.calls[0][0];

We can invoke that callback whenever we like, independent of our application's dispatcher or action creators. We will, in fact, fake the behavior of the dispatcher and action creators by invoking the callback with an action that we'll create directly in our test.

var payload = {
  source: 'VIEW_ACTION',
  action: {
    actionType: TodoConstants.TODO_CREATE,
    text: 'foo'
  }
};
callback(payload);
var all = TodoStore.getAll();
var keys = Object.keys(all);
expect(all[keys[0]].text).toEqual('foo');

Putting it All Together #

The example Flux TodoMVC application has been updated with an example test for the TodoStore, but let's look at an abbreviated version of the entire test. The most important things to notice in this test are how we keep a reference to the store's registered callback in the closure of the test, and how we recreate the store before every test so that we clear the state of the store entirely.

jest.dontMock('../TodoStore');
jest.dontMock('react/lib/merge');

describe('TodoStore', function() {

  var TodoConstants = require('../../constants/TodoConstants');

  // mock actions inside dispatch payloads
  var actionTodoCreate = {
    source: 'VIEW_ACTION',
    action: {
      actionType: TodoConstants.TODO_CREATE,
      text: 'foo'
    }
  };
  var actionTodoDestroy = {
    source: 'VIEW_ACTION',
    action: {
      actionType: TodoConstants.TODO_DESTROY,
      id: 'replace me in test'
    }
  };

  var AppDispatcher;
  var TodoStore;
  var callback;

  beforeEach(function() {
    AppDispatcher = require('../../dispatcher/AppDispatcher');
    TodoStore = require('../TodoStore');
    callback = AppDispatcher.register.mock.calls[0][0];
  });

  it('registers a callback with the dispatcher', function() {
    expect(AppDispatcher.register.mock.calls.length).toBe(1);
  });

  it('initializes with no to-do items', function() {
    var all = TodoStore.getAll();
    expect(all).toEqual({});
  });

  it('creates a to-do item', function() {
    callback(actionTodoCreate);
    var all = TodoStore.getAll();
    var keys = Object.keys(all);
    expect(keys.length).toBe(1);
    expect(all[keys[0]].text).toEqual('foo');
  });

  it('destroys a to-do item', function() {
    callback(actionTodoCreate);
    var all = TodoStore.getAll();
    var keys = Object.keys(all);
    expect(keys.length).toBe(1);
    actionTodoDestroy.action.id = keys[0];
    callback(actionTodoDestroy);
    expect(all[keys[0]]).toBeUndefined();
  });

});

You can take a look at all this code in the TodoStore's tests on GitHub as well.

Mocking Data Derived from Other Stores #

Sometimes our stores rely on data from other stores. Because all of our modules are mocked, we'll need to simulate the data that comes from the other store. We can do this by retrieving the mock function and adding a custom return value to it.

var MyOtherStore = require('../MyOtherStore');
MyOtherStore.getState.mockReturnValue({
  '123': {
    id: '123',
    text: 'foo'
  },
  '456': {
    id: '456',
    text: 'bar'
  }
});

Now we have a collection of objects that will come back from MyOtherStore whenever we call MyOtherStore.getState() in our tests. Any application state can be simulated with a combination of these custom return values and the previously shown technique of working with the store's registered callback.

A brief example of this technique is up on GitHub within the Flux Chat example's UnreadThreadStore-test.js.

For more information about the mock property of mocked methods or Jest's ability to provide custom mock values, see Jest's documentation on mock functions.

Moving Logic from React to Stores #

What often starts as a little piece of seemingly benign logic in our React components often presents a problem while creating unit tests. We want to be able to write tests that read like a specification for our application's behavior, and when application logic slips into our view layer, this becomes more difficult.

For example, when a user has marked each of their to-do items as complete, the TodoMVC specification dictates that we should also change the status of the "Mark all as complete" checkbox automatically. To create that logic, we might be tempted to write code like this in our MainSection's render() method:

var allTodos = this.props.allTodos;
var allChecked = true;
for (var id in allTodos) {
  if (!allTodos[id].complete) {
    allChecked = false;
    break;
  }
}
...

return (
  <section id="main">
  <input
    id="toggle-all"
    type="checkbox"
    checked={allChecked ? 'checked' : ''}
  />
  ...
  </section>
);

While this seems like an easy, normal thing to do, this is an example of application logic slipping into the views, and it can't be described in our spec-style TodoStore test. Let's take that logic and move it to the store. First, we'll create a public method on the store that will encapsulate that logic:

areAllComplete: function() {
  for (var id in _todos) {
    if (!_todos[id].complete) {
      return false;
    }
  }
  return true;
},

Now we have the application logic where it belongs, and we can write the following test:

it('determines whether all to-do items are complete', function() {
  var i = 0;
  for (; i < 3; i++) {
    callback(mockTodoCreate);
  }
  expect(TodoStore.areAllComplete()).toBe(false);

  var all = TodoStore.getAll();
  for (key in all) {
    callback({
      source: 'VIEW_ACTION',
      action: {
        actionType: TodoConstants.TODO_COMPLETE,
        id: key
      }
    });
  }
  expect(TodoStore.areAllComplete()).toBe(true);

  callback({
    source: 'VIEW_ACTION',
    action: {
      actionType: TodoConstants.TODO_UNDO_COMPLETE,
      id: key
    }
  });
  expect(TodoStore.areAllComplete()).toBe(false);
});

Finally, we revise our view layer. We'll call for that data in the controller-view, TodoApp.js, and pass it down to the MainSection component.

function getTodoState() {
  return {
    allTodos: TodoStore.getAll(),
    areAllComplete: TodoStore.areAllComplete()
  };
}

var TodoApp = React.createClass({
...

  /**
   * @return {object}
   */
  render: function() {
    return (
      ...
      <MainSection
        allTodos={this.state.allTodos}
        areAllComplete={this.state.areAllComplete}
      />
      ...
    );
  },

  /**
   * Event handler for 'change' events coming from the TodoStore
   */
  _onChange: function() {
    this.setState(getTodoState());
  }

});

And then we'll utilize that property for the rendering of the checkbox.

render: function() {
  ...

  return (
    <section id="main">
    <input
      id="toggle-all"
      type="checkbox"
      checked={this.props.areAllComplete ? 'checked' : ''}
    />
    ...
    </section>
  );
},

To learn how to test React components themselves, check out the Jest tutorial for React and the ReactTestUtils documentation.

Further Reading #